Peeling Paint Repair in Chicago: Window Sill and Baseboard Prep on W Granville Ave
Peeling paint is one of the most common problems we see in Chicago homes, and it rarely fixes itself with another coat. On our most recent job, on W Granville Ave in the Edgewater neighborhood on the city’s North Side, the homeowner asked us to deal with a bathroom window sill that was flaking every few months and baseboards where decades of paint had started to lift away from the wood. This case study shows the before and after photos, explains why the paint was failing and walks through the prep and painting steps we used so the new finish lasts.
The Short Answer
How do you fix peeling paint on window sills and baseboards? Goodman Painters & Decorators removed every loose layer with scrapers, sanded the edges smooth so old paint lines would not show, cleaned and deglossed the surfaces, spot-primed bare wood with a bonding primer, filled gaps and dents, caulked the joints, then applied a fresh primer and two finish coats of durable enamel. On the bathroom window we used a higher-sheen enamel that stands up to moisture and wipes clean. Painting over peeling paint without this prep only traps the problem under a new layer.
Before and After Photos
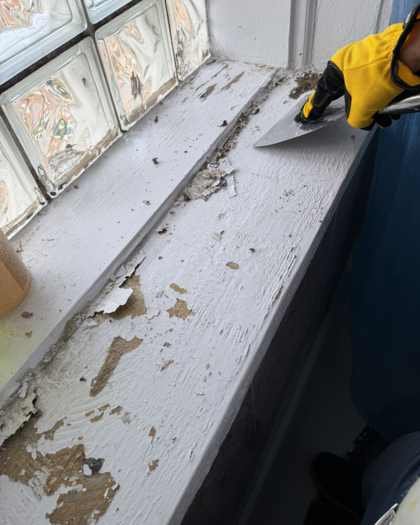
Before: paint on the bathroom sill cracked, curled and lifted down to older coats and bare wood.
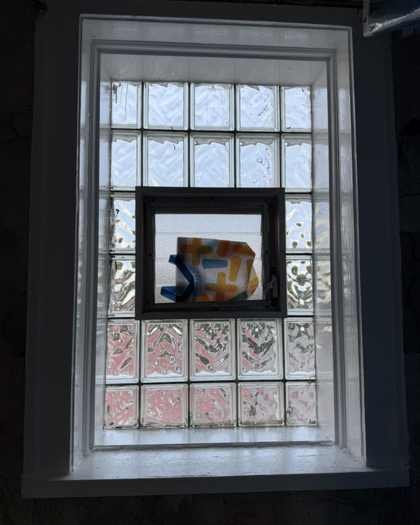
After: window sill, jambs and trim scraped, primed and finished in a durable white enamel.
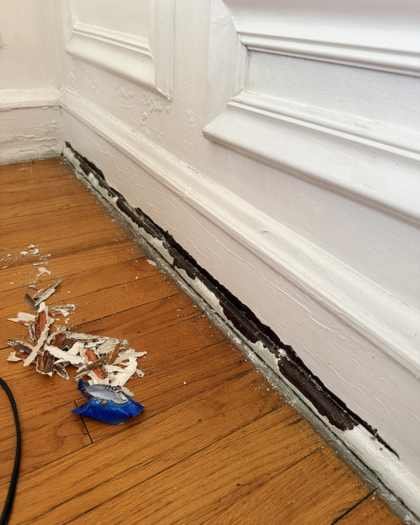
Before: layered paint peeling off the baseboard, exposing the dark original finish.
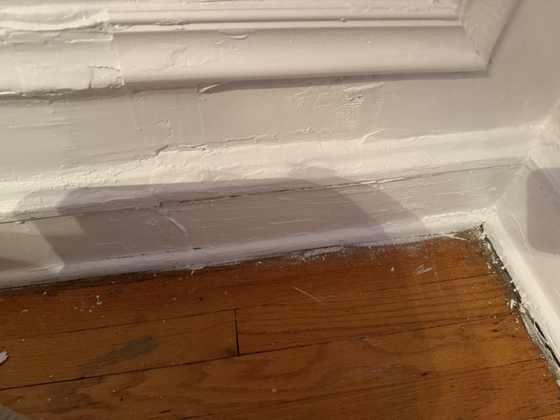
After: failing paint removed, gaps filled and caulked, and the baseboard primed and painted.
Project at a Glance
- Location: W Granville Ave, Edgewater, Chicago, Illinois
- Project type: Interior prep and repaint to repair peeling paint
- Surfaces: Bathroom glass-block window sill, jambs and trim; baseboards and wainscot panel molding
- Main issues: Flaking paint on a damp bathroom sill, layered paint lifting off baseboards, gaps at trim joints
- Contractor: Goodman Painters & Decorators, serving Chicago homeowners since 2012
The Before: What We Found
Like many buildings on the North Side, this home has vintage character: hardwood floors, deep baseboards and wainscot walls finished with applied panel molding, and a bathroom window filled with glass block. That character comes with a long painting history. The trim had been painted many times over the years, and some of those coats were no longer bonded to the layers below.
In the bathroom, the wide window sill sits right under the glass block, where condensation collects on cold days and water splashes from daily use. The paint on the sill had cracked, curled and lifted in patches, exposing older coats and bare wood underneath. Every time the homeowner wiped the sill, more flakes came off.
Along the baseboards, the top layers had separated from a dark original finish underneath. When we started scraping, long strips of paint came away easily, which told us the newer paint had never gripped the old surface properly. There were also open gaps where the baseboard met the floor and the wall.
Why Paint Peels on Window Sills and Baseboards
Before choosing products, we always work out why paint failed. Otherwise the same problem returns within a season or two. On this project, three causes were working together:
- Moisture. Bathroom window sills see condensation, steam and splashes. Water that gets behind the paint film through small cracks pushes the paint away from the wood as it dries and expands.
- Poor adhesion between layers. Many older Chicago homes have oil-based paint or a varnished finish on the trim. Latex paint applied over glossy oil without cleaning, sanding and a bonding primer often looks fine at first, then peels in sheets.
- Too many layers. After decades of repainting, a thick paint build-up becomes brittle. It cracks at joints and corners, and one weak layer underneath can take everything above it off with it.
Baseboards add their own wear: mops, vacuums and furniture knock against them every day, and cleaning water can soak into unsealed gaps at the floor line. That is why prep, adhesion and the right sheen matter more on trim than almost anywhere else in the house.
Our Prep and Painting Process
1. Protect the room
We covered the hardwood floors with drop cloths, masked the glass block and nearby surfaces and cleared the work area. Scraping old paint makes a mess, so containment and daily cleanup are part of the job, not an afterthought.
2. Scrape off every loose layer
Using stiff scrapers and a putty knife, we removed all paint that was cracked, curled or loose. On the baseboards, that meant taking the failing coats down to the firmly bonded surface underneath. Anything that could be lifted with a scraper would eventually have lifted on its own.
3. Sand and feather the edges
Where solid paint met scraped areas, we sanded the edges smooth. Feathering keeps the outlines of the old paint from showing through the new finish, so the repaired areas blend with the rest of the trim.
4. Clean and degloss
Soap residue in a bathroom and grime along a baseboard both stop new paint from bonding. We cleaned the surfaces and scuff-sanded the remaining glossy paint so the primer had something to grip.
5. Prime bare wood with a bonding primer
Bare wood and old oil-based coats were spot-primed with a bonding primer made to stick to hard, glossy surfaces and to seal wood. This step is what separates a lasting repair from a quick cover-up.
6. Fill, patch and caulk
We filled dents and low spots left by the missing paint, patched the wall where it meets the trim and caulked open joints, including the gap between the baseboard and the floor. Sealed joints keep out moisture and dirt and make the trim look crisp.
7. Prime and apply two finish coats
After a full coat of primer, we applied two coats of trim enamel. The bathroom sill, jambs and window trim received a higher-sheen enamel that sheds water and can be wiped down. The baseboards and wainscot molding were finished to match the rest of the room’s trim.
Choosing the Right Sheen for Trim and Sills
Sheen is not only about looks. Flatter finishes hide flaws but absorb moisture and marks, while semi-gloss and gloss enamels form a harder, more washable film. For a bathroom window sill that sees condensation every winter, a glossier enamel is the practical choice. Our paint sheen guide explains which finish we recommend for each surface in a Chicago home, and our interior painting prep guide covers the preparation steps in more detail.
A Note on Older Chicago Buildings and Lead Paint
A large share of Chicago’s housing, including many buildings in Edgewater, Rogers Park and Andersonville, was built before 1978, when lead-based paint was banned for residential use. Older layers of paint on trim, windows and doors can contain lead, and scraping or sanding them creates dust. Federal rules require renovation and painting firms to follow lead-safe work practices when they disturb paint in pre-1978 homes.
If your home is older, ask any contractor how they will test for lead, contain dust and clean up before the work starts, and keep children and pets out of the work area until it is done. It is a reasonable question, and a professional painter should have a clear answer.
The Results
The finished window has clean, bright trim around the glass block and a smooth, glossy sill with no ridges where the old paint used to peel. Along the baseboards, the dark original finish is sealed under primer and fresh paint, the floor joint is caulked and the panel molding reads as one continuous detail again. Most importantly, the new coats are bonded to a sound, primed surface instead of sitting on top of paint that was already letting go.
With the moisture exposure in mind, we also gave the homeowner simple care advice: wipe condensation off the sill during cold snaps, run the bathroom fan during and after showers and clean the trim with a soft cloth and mild cleaner rather than abrasive pads. For more on how long different finishes hold up, see how long interior paint lasts.
Tips for Chicago Homeowners Dealing with Peeling Paint
- Look for the cause first. Peeling near windows, tubs and exterior walls usually points to moisture. Fix leaks and ventilation before painting.
- Test for oil-based paint. Rub a small spot of trim with a cotton ball and rubbing alcohol. If paint comes off, it is latex; if not, it is likely oil and needs a bonding primer before latex.
- Budget for prep, not just paint. On older trim, most of the labor is scraping, sanding, priming and caulking. That work is what makes the finish last.
- Choose the right sheen. Semi-gloss or gloss enamel for sills, baseboards and bathroom trim; softer sheens for walls and ceilings.
- Ask about lead-safe practices if your building was built before 1978.
Peeling Paint Repair FAQs
Bathroom sills collect condensation from the window and moisture from showers. When water gets behind the paint through small cracks, it breaks the bond with the wood. Peeling also happens when latex paint was applied over old oil-based paint without a bonding primer. A lasting repair removes the loose paint, seals bare wood with primer and finishes with a moisture-resistant enamel.
No. New paint is only as strong as the surface underneath. If you paint over loose or flaking layers, the new coat will lift off with them, often within months. The loose paint has to be scraped off, the edges sanded smooth and the surface primed before any finish coats go on.
Wipe a small, hidden area with a cotton ball dampened with rubbing alcohol. If paint transfers to the cotton, it is latex. If nothing comes off, the trim is most likely coated in oil-based paint or varnish, which needs cleaning, scuff-sanding and a bonding primer before latex paint.
Semi-gloss or gloss enamel is the usual choice. These sheens form a harder, more washable film that resists moisture, scuffs and cleaning. On a bathroom window sill that sees condensation, we lean toward the glossier end.
It may be if your home was built before 1978. Many Chicago buildings are older than that, and lead paint is often found on windows, doors and trim under newer coats. A test is the only way to know for sure, and any contractor disturbing paint in a pre-1978 home should follow lead-safe work practices.
Yes. We work throughout Chicago, including Edgewater, Andersonville, Rogers Park, Uptown and Lincoln Square, as well as the suburbs. Send us a few photos of the problem areas and we will follow up with a free, itemized estimate.
Serving Edgewater and All of Chicago
Goodman Painters & Decorators has helped Chicago homeowners with interior painting, trim and door painting, drywall and plaster repair and remodeling since 2012. We are licensed and insured, and every estimate lists the prep work in writing so you know exactly what is included. See more of our completed work in our project portfolio, or learn about the neighborhood on our Edgewater painters page.
If peeling paint on your sills, baseboards, doors or walls keeps coming back, we are glad to take a look. We are available Monday through Saturday, 6 a.m. to 6 p.m.
Peeling Paint in Your Chicago Home?
Tell us about your trim, windows or walls and we will follow up with a clear, no-obligation estimate.